
We’ve been working on the Storgage application (not on the App Store yet) for the last few months, and we would like to share one of the techniques we used when developing it.
Problem
One of our app’s features is the use of the built-in instant messaging service for users to talk to each other and view transaction history details. The design of the screen looks like this:
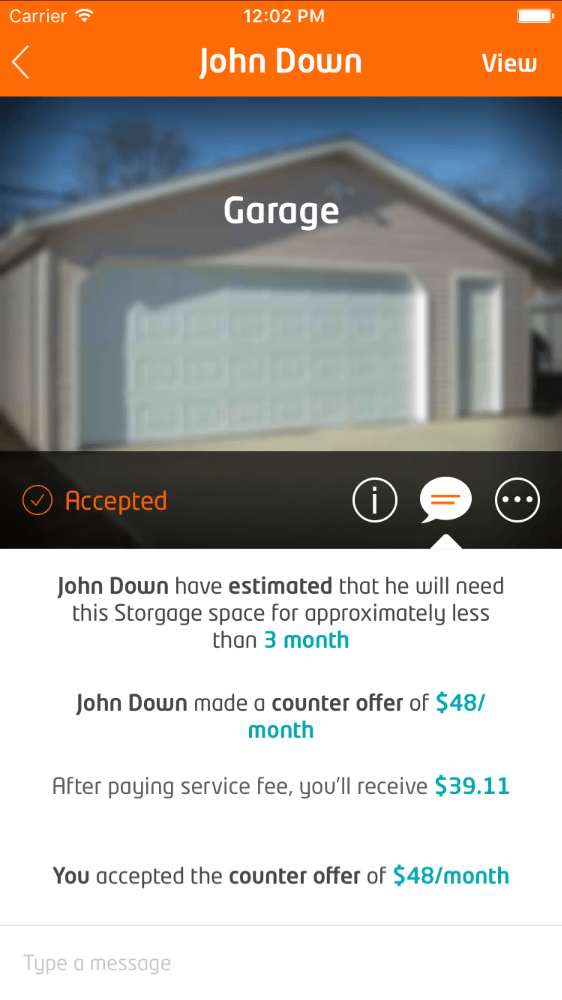
As you can see, the chat area is located at the bottom of the screen and is covered by the pop-up system keyboard when the user taps “Type a message”.
Solution
We decided that an animated “Type a message” input field should appear when the system keyboard pops up, and the chat area should be pushed to the top of the screen. When the keyboard is dismissed (by tapping the chat area or the Send button), the screen should return to its original state. Here’s an example of the behavior we wanted to implement:
Problem Two
At this point, we faced another problem. The messaging controller is a child of the main screen controller. Stretching the chat window to full screen has to be carried out by the parent, and we have to tell it when to do so.
Solution Two
We used the delegation pattern to inform the parent controller about the appearance and disappearance of the keyboard so that it could position the built-in messaging controller properly.
Implementation
The Storgage project is written in Objective-C, but to better demonstrate the solutions to the problems in this article, we’ll create an example project written in Swift.
First, let’s create an empty “Single View Application” project. Name it “ChildControllerKeyboard” and choose Swift as the language.

Then add two classes: ContainerViewController and ChildViewController inherited from UIViewController. To do this, select File > New File… from the menu. Then choose “Cocoa Touch Class” from the pop-up window and populate the fields with the corresponding values.
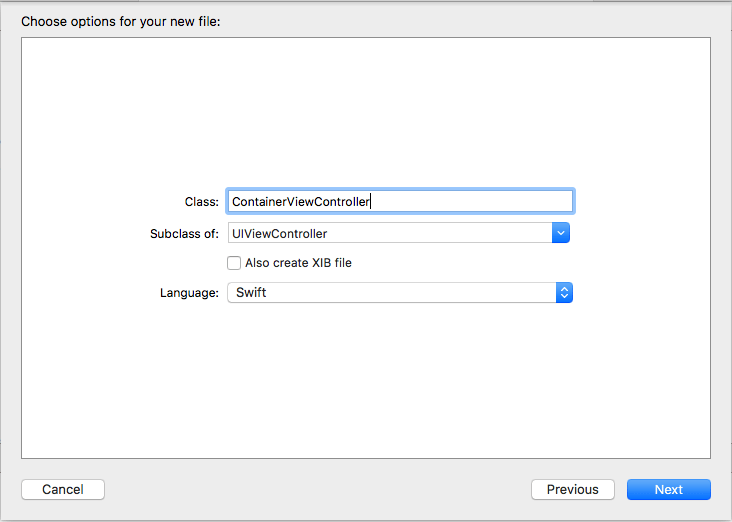
Repeat for the ChildViewController. The ViewController.swift file can then be deleted.
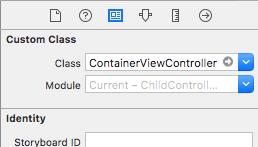
Now switch to Main.storyboard and change the controller class from ViewController to ContainerViewController.
Adding a view to the contents of the main controller
Put the View object from the Object Library onto the controller and set the following constraints, attaching it to the screen edges and setting the height equal to half of the screen:
- Trailing Space to: Superview = 0
- Leading Space to: Superview = 0
- Top Space to: Superview = 0
- Equal Height to: Superview = 0, Multiplier = 0.5
Enter the value “Content View” in the Label field on the Identity Inspector tab, then change the Background value to Light Gray Color on the Attributes Inspector tab. In the end, our controller should look like this:

Adding a child controller
Put the Container View object from the Object Library below the Content View on the controller and set the following constraints, attaching it to the bottom of the screen and the Content View:
- Trailing Space to: Superview = 0
- Leading Space to: Superview = 0
- Bottom Space to: Superview = 0
- Top Space to: Content View = 0
Change the class of the built-in controller to ChildViewController and select the child controller’s View. Change the Background value to Dark Gray Color in the Attributes Inspector tab. Then find the Text Field object in the Object Library and place it onto the child controller, attaching it to the bottom of the screen by setting the following constraints:
- Trailing Space to: Superview = 0
- Leading Space to: Superview = 0
- Bottom Space to: Superview = 0
Our Main.storyboard should now look like this:

Now, we can switch to the ChildViewController file and start writing code. The first step is add an Outlet for the text field
@IBOutlet weak var textFieldBottomConstraint: NSLayoutConstraint!
and associate it with the constraint “Bottom Space to: Superview.” It will be necessary to adjust the location of the text field to the bottom of the screen. When the keyboard appears, we’ll change the value of this variable to the keyboard height, and when the keyboard is hidden, we’ll return to the original zero value.
The next step is to add the ability to hide the keyboard. We’ll provide two methods to do this:
- Tap on the contents of the child controller outside the text box. In this case, the Dark Gray area.
- Press the Return key on the keyboard.
To implement the first option, add the following code to the viewDidLoad handler
let tapGestureRecognizer = UITapGestureRecognizer(target: self,
  action: #selector(viewTapHandler(recognizer:)))
view.addGestureRecognizer(tapGestureRecognizer)
and implement the viewTapHandler method as follows
func viewTapHandler(recognizer: UITapGestureRecognizer) {
  view.endEditing(true)
}
In this code, we add tap detection to the controller root view. When a tap has been detected, we turn off edit mode for the view and its subviews so the text field is no longer the first responder and the keyboard disappears.
In order to implement the second option, we must turn our controller into the text field delegate and implement the textFieldShouldReturn delegate method
extension ChildViewController: UITextFieldDelegate {
  func textFieldShouldReturn(_ textField: UITextField) -> Bool {
    return textField.resignFirstResponder()
  }
}
In the textFieldShouldReturn method we resign first responder status on the text field. Now we need to return to Main.storyboard and make ChildViewController the delegate of the text field. The next stage of implementing the child controller is process the system keyboard appearance and disappearance events. To do this, we’ll redefine the viewWillAppear method and subscribe to the keyboard appearance and disappearance events.
override func viewWillAppear(_ animated: Bool) {
  super.viewWillAppear(animated)
  NotificationCenter.default.addObserver(self,
    selector: #selector(keyboardWillShow(notification:)),
    name: .UIKeyboardWillShow,
    object: nil)
  NotificationCenter.default.addObserver(self,
    selector: #selector(keyboardWillHide(notification:)),
    name: .UIKeyboardWillHide,
    object: nil)
}
If we subscribe to system events, we must provide a way to unsubscribe from them, so we redefine the viewDidDisappear method and remove ourselves from the Observers’ keyboard events.
override func viewDidDisappear(_ animated: Bool) {
  super.viewDidDisappear(animated)
  NotificationCenter.default.removeObserver(self,
    selector: #selector(keyboardWillShow(notification:)),
    name: .UIKeyboardWillShow,
    object: nil)
  NotificationCenter.default.removeObserver(self,
    selector: #selector(keyboardWillHide(notification:)),
    name: .UIKeyboardWillHide,
    object: nil)
}
Now, when the keyboard appears, our keyboardWillShow method is called. When it disappears, the keyboardWillHide method is called. We don’t have these methods yet, so we’ll have to add them, but for now let’s leave them blank.
func keyboardWillShow(notification: NSNotification) {
}
func keyboardWillHide(notification: NSNotification) {
}
In both of these methods, the NSNotification class object is transmitted. From this object, we need to get the size of the keyboard and the speed and animation parameters. We’ll use this information to expand the child controller to full screen and initiate the input field so it’s not blocked by the keyboard.
The parent controller is in charge of expanding the child controller. Since we decided to use delegation to address this problem, we must make the parent controller a delegate of the child. The child controller should then be able to inform the parent about the appearance or disappearance of the keyboard. To do this, we’ll add the following protocol to the child controller:
protocol ChildViewControllerKeyboardDelegate: class {
  func keyboardWillShow(withFrame frame: CGRect,
    animationDuration: TimeInterval,
    options: UIViewAnimationOptions)
  func keyboardWillHide(withFrame frame: CGRect,
    animationDuration: TimeInterval,
    options: UIViewAnimationOptions)
}
and the following property, which will be the child controller delegate
weak var keyboardDelegate: ChildViewControllerKeyboardDelegate?
Now that we have a delegate, let’s implement a method that will get the parameters from the NSNotification object and call the delegate methods with these parameters. We’ll also use these parameters for the text field animation. We’ll call this method from our keyboardWillShow and keyboardWillHide methods, and we’ll also pass on the information about opening and hiding the keyboard to it. As a result, the code to process keyboard events should look like this:
func keyboardWillShow(notification: NSNotification) {
  keyboardWill(show: true, keyboardNotification: notification)
}
func keyboardWillHide(notification: NSNotification) {
  keyboardWill(show: false, keyboardNotification: notification)
}
func keyboardWill(show isShow: Bool,
keyboardNotification notification: NSNotification) {
  if let userInfo = notification.userInfo {
    var animationDuration: TimeInterval = 0
    if let duration =
      userInfo[UIKeyboardAnimationDurationUserInfoKey] as? NSNumber {
      animationDuration = duration.doubleValue
    }
    var keyboardEndFrame: CGRect = CGRect.zero
    if let frameEnd =
    userInfo[UIKeyboardFrameEndUserInfoKey] as? NSValue {
      keyboardEndFrame = frameEnd.cgRectValue
    }
    var animationCurve: UInt = 0
    if let curve =
      userInfo[UIKeyboardAnimationCurveUserInfoKey] as? NSNumber {
      animationCurve = curve.uintValue
    }
    // convert UIViewAnimationCurve to UIViewAnimationOptions
    // (see UIViewAnimationOptions help)
    let animationOptionCurve = UIViewAnimationOptions(
      rawValue: animationCurve << 16)
    let options: UIViewAnimationOptions = [
      UIViewAnimationOptions.beginFromCurrentState,
      animationOptionCurve]
    if isShow {
      keyboardDelegate?.keyboardWillShow(
        withFrame: keyboardEndFrame,
        animationDuration: animationDuration,
        options: options)
    }
    else {
      keyboardDelegate?.keyboardWillHide(
        withFrame: keyboardEndFrame,
        animationDuration: animationDuration,
        options: options)
    }
    textFieldBottomConstraint.constant =
      (!isShow) ? 0 : keyboardEndFrame.height
    UIView.animate(withDuration: animationDuration,
      delay: 0,
      options: options,
      animations: {
        self.view.layoutIfNeeded()
      },
      completion: nil)
  }
}
Let’s take a closer look at the method keyboardWill(show isShow: Bool, keyboardNotification notification: NSNotification). At the beginning of the method, we get information from the notification about the animation parameters and the size of the keyboard. According to the documentation, in order to obtain the corresponding value of the UIViewAnimationOptions type from the variable of the UIViewAnimationCurve type, we need to do a bitwise left shift by 16. When we have these parameters, we can call the appropriate delegate method and change the indentation of the text input field to the required value. At the end of the method, we make an animated rearrangement of the subviews in order to get the animated movement of the text input field.
Implementation of the main controller delegation
Now, let’s switch to the ContainerViewController class and implement its ChildViewControllerKeyboardDelegate protocol. To do this let’s create the following class extension
extension ContainerViewController: ChildViewControllerKeyboardDelegate {
  func keyboardWillShow(withFrame frame: CGRect,
    animationDuration: TimeInterval,
    options: UIViewAnimationOptions) {
  }
  func keyboardWillHide(withFrame frame: CGRect,
    animationDuration: TimeInterval,
    options: UIViewAnimationOptions) {
  }
}
Currently, the protocol methods are empty, and we have to implement the change of the attached controller sizes in them. To do this, add two Outlets for the Content View object and its Top Space to: Superview constraint and associate them with the relevant objects in Main.storyboard:
@IBOutlet weak var contentView: UIView!
@IBOutlet weak var contentViewTopConstraint: NSLayoutConstraint!
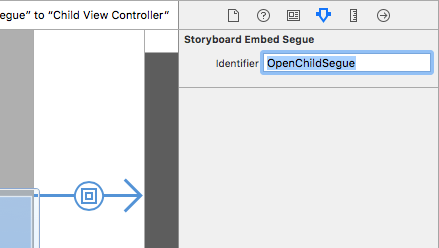
Switch to Main.storyboard and give the segue connecting the main controller the name OpenChildSegue
and redefine the method prepare (for segue: UIStoryboardSegue, sender:? Any) in the ContainerViewController class as follows:
override func prepare(for segue: UIStoryboardSegue, sender: Any?) {
  if segue.identifier == "OpenChildSegue" {
    if let childController = segue.destination as? ChildViewController {
      childController.keyboardDelegate = self
    }
  }
}
Here, we assign ContainerViewController to be a delegate of the attached ChildViewController. Now, let’s go back to the protocol methods and implement them as follows:
func keyboardWillShow(withFrame frame: CGRect,
  animationDuration: TimeInterval,
  options: UIViewAnimationOptions) {
    contentViewTopConstraint.constant = -contentView.frame.height
    UIView.animate(withDuration: animationDuration,
      delay: 0,
      options: options,
      animations: {
        self.view.layoutIfNeeded()
      },
      completion: nil)
}
func keyboardWillHide(withFrame frame: CGRect,
  animationDuration: TimeInterval,
  options: UIViewAnimationOptions) {
    contentViewTopConstraint.constant = 0
    UIView.animate(withDuration: animationDuration,
      delay: 0,
      options: options,
      animations: {
        self.view.layoutIfNeeded()
      },
      completion: nil)
}
When the keyboard appears, we change the Content View layout so it goes over the top of the screen, and since our attached controller is tied to Content View, it automatically extends to the top of the screen. When the keyboard disappears, we return Content View to its original position, thus reducing the attached controller to the original dimensions.
Run the project on a simulator or device, and you should see the following behavior:
Summary
In the end, we solved the problem using the delegation pattern and Auto Layout technology. Use the following link to download the project’s source code.